Enable an AI chat on MicroBlaze with the Arty A7-35T

A new year has arrived, and I want to start the season with a project that leaves no one indifferent. Since 2025 is the year of AI and AI agents, it has to be an AI project. I also wanted something different: not AI code generation or testbenches, and not yet another agent that simulates designs and fixes errors. So I chose what might be the most popular, but for developers the most useless, AI application: AI chats.
Adam Taylor already explored this idea in his Hackster project, but he ran into the limited processing power of the Zynq MPSoC compared to the data centers that actually run these models. So why not use those data centers instead?
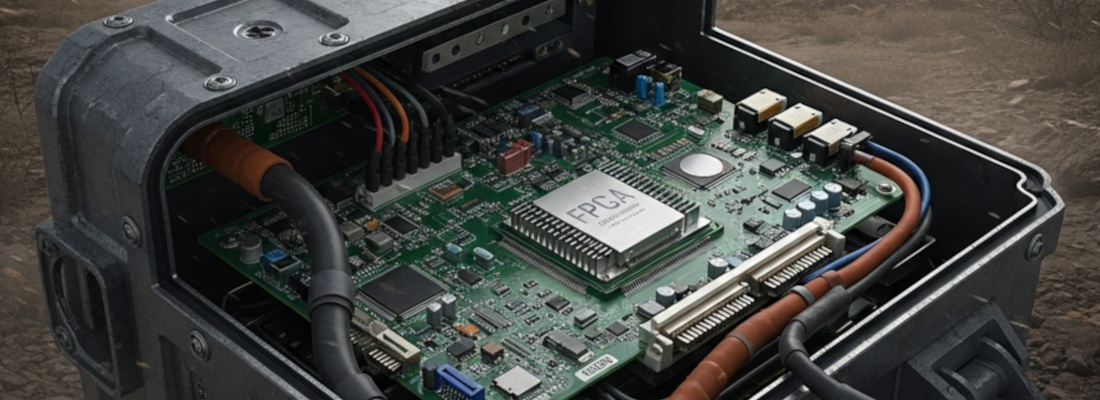
The idea is to use an API to run the model remotely. Then the processor only has to send HTTP requests, something even a small soft core like MicroBlaze can handle. If it runs Linux, it can definitely do it. Regarding the board, I chose the Arty A7-35T FPGA development board because it is a very popular and affordable board, and it has enough resources to run Linux on a MicroBlaze, but essentially, any FPGA development board would work.
Finally, I needed an API, preferably open and free, that does not require installing anything on the host. That is where Pollinations.ai comes in.
Table of contents
- Hardware design
- The clocking structure
- PetaLinux build
- Device tree modifications
- Booting up the board
- AI chat script
- Conclusions
Hardware design
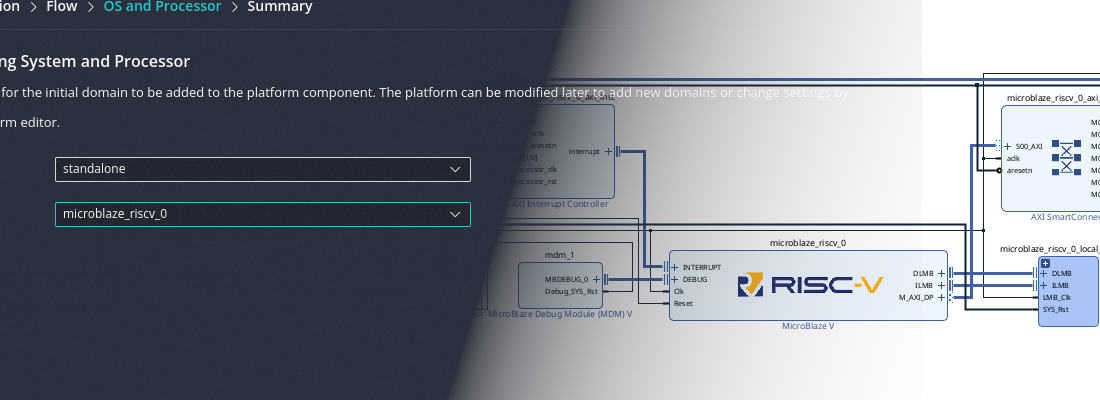
The MicroBlaze will execute Linux, so it needs the Memory Management Unit (MMU) enabled. The fastest way to get a correct baseline is to select the Application preset in the MicroBlaze configuration.
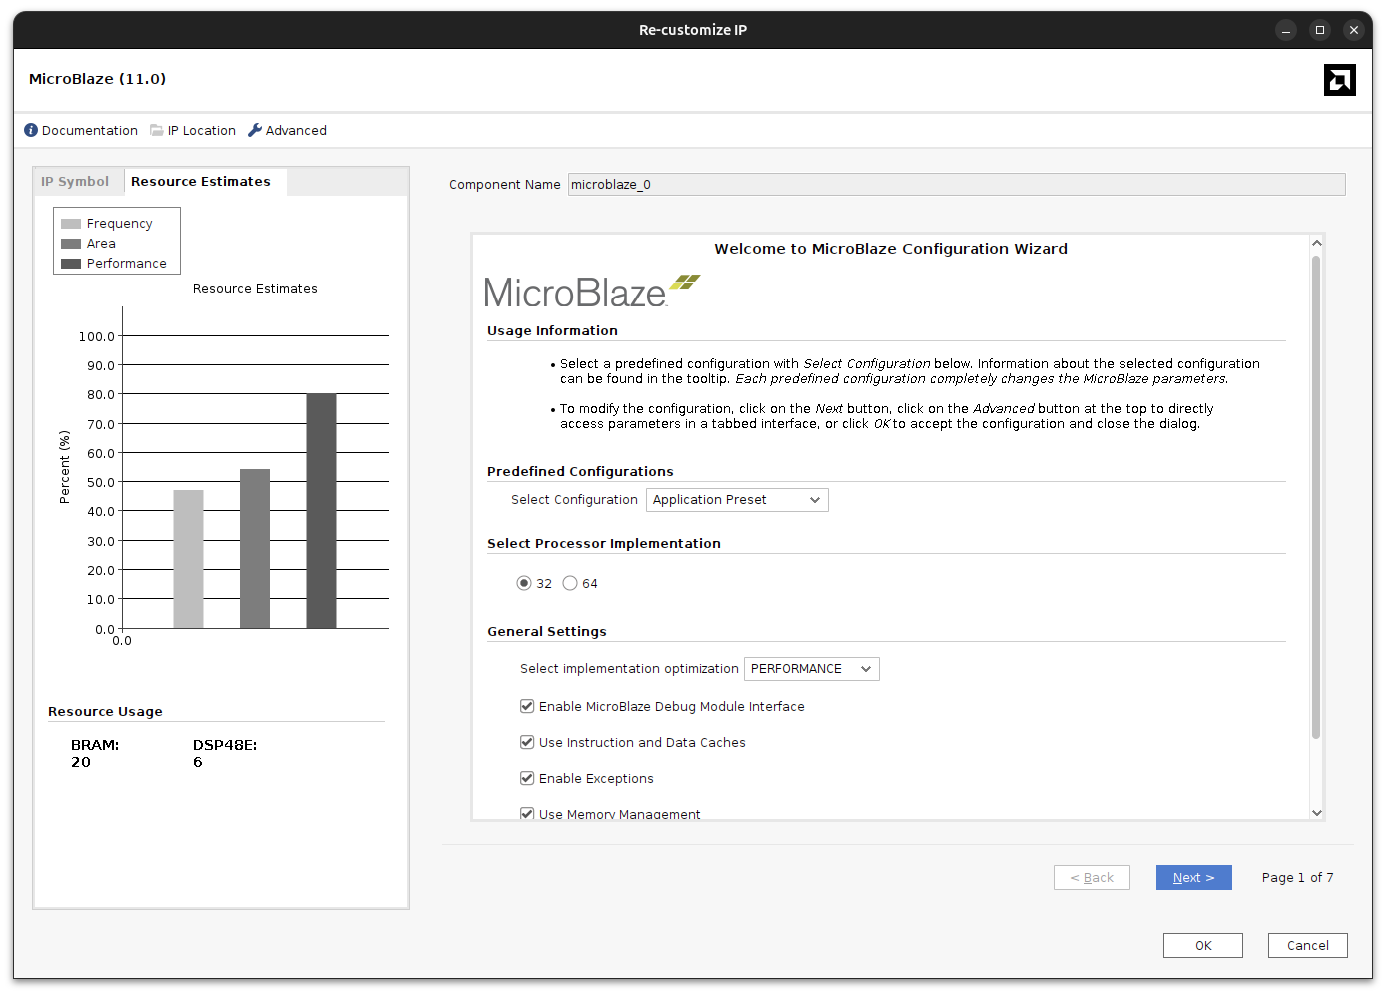
With this preset, Vivado enables the instruction/data caches, AXI4 interfaces for peripherals, and the debug configuration that Linux expects.
In addition, to boot PetaLinux we also need a few AXI peripherals:
- AXI Timer for the Linux timer tick and timekeeping.
- AXI UART Lite (or AXI UART16550) for the serial console.
- AXI Ethernet Lite to bring network access to the board.
Connect the peripherals to the AXI interconnect, drive clocks and resets from the Processor System Reset block, and wire the interrupt outputs to the MicroBlaze interrupt input through a concat or INTC block. The DDR3 controller (MIG 7-series) connects to the MicroBlaze via AXI and is required for Linux.
The clocking structure
I first tried to use a single Clocking Wizard for all clocks, but Vivado complained about the lack of a dedicated clock route. The usual workaround is to allow a non-dedicated route, but that made DDR transfers unstable during Linux boot (kernel overrun errors). So I changed the strategy.
Because the MIG7 has an integrated MMCM, I tried to use it to generate the 25 MHz clock for the Ethernet PHY. The idea was to feed sys_clk_i into the MIG, use the MIG MMCM for its 200 MHz ref_clk_i, and also derive the PHY clock. That looked correct, but Ethernet was unreliable: it negotiated 10 Mbps and ping never worked.
The root cause was the MIG MMCM lock sequence. The MMCM only stabilizes after DDR3 calibration, which is too late for the PHY. The PHY boots into a bad state and never negotiates correctly.
At this point I kept the MIG MMCM strictly for DDR, and provided a separate clock that starts as soon as power is applied for the Ethernet PHY.
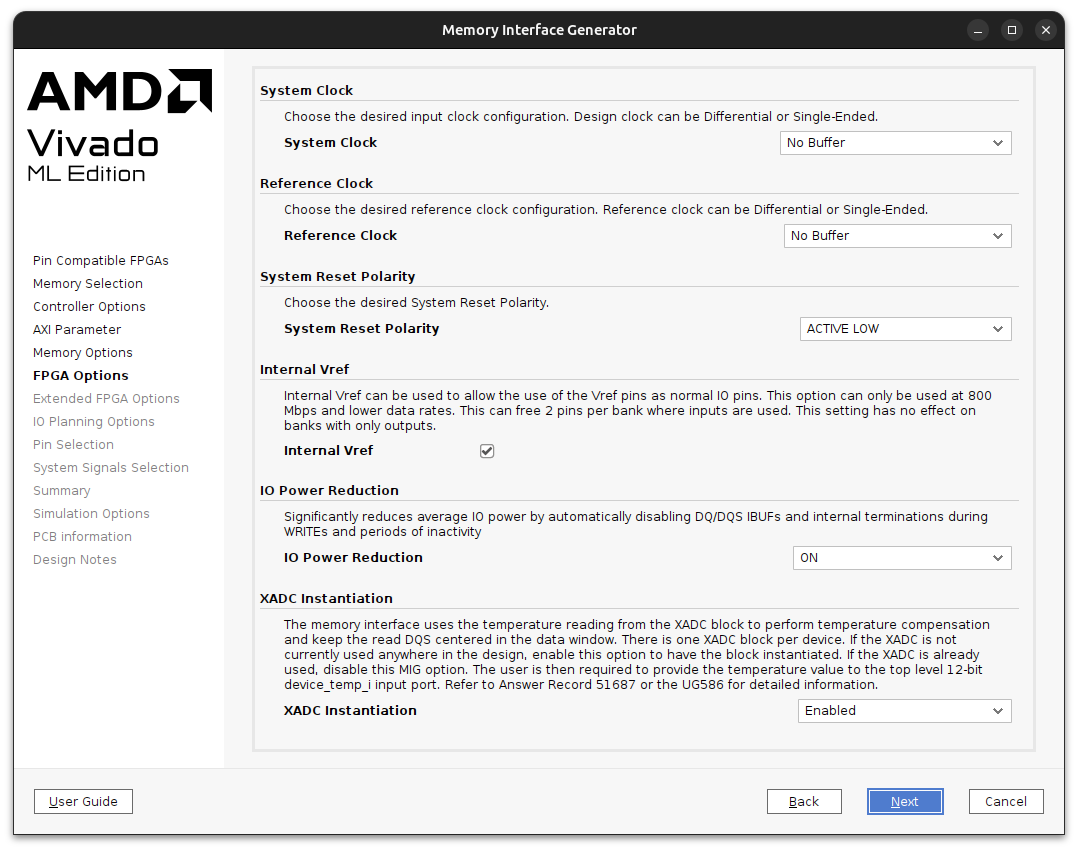
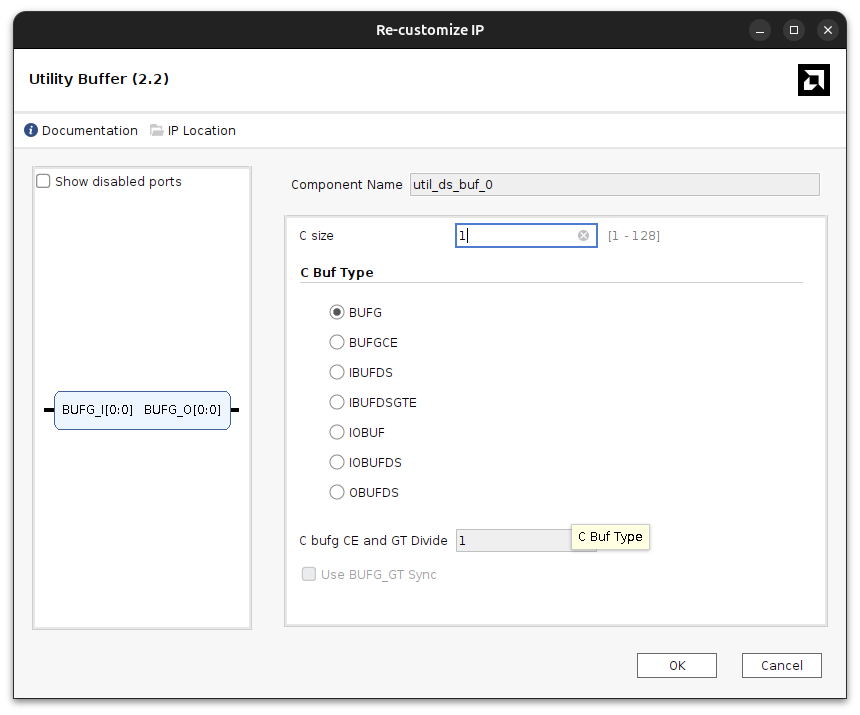
To share the same input clock between the Clocking Wizard and the MIG, both blocks must be configured without an input buffer. Then a single external BUFG distributes the clock to both inputs. This avoids the double-BUFG conflict and keeps the design legal.
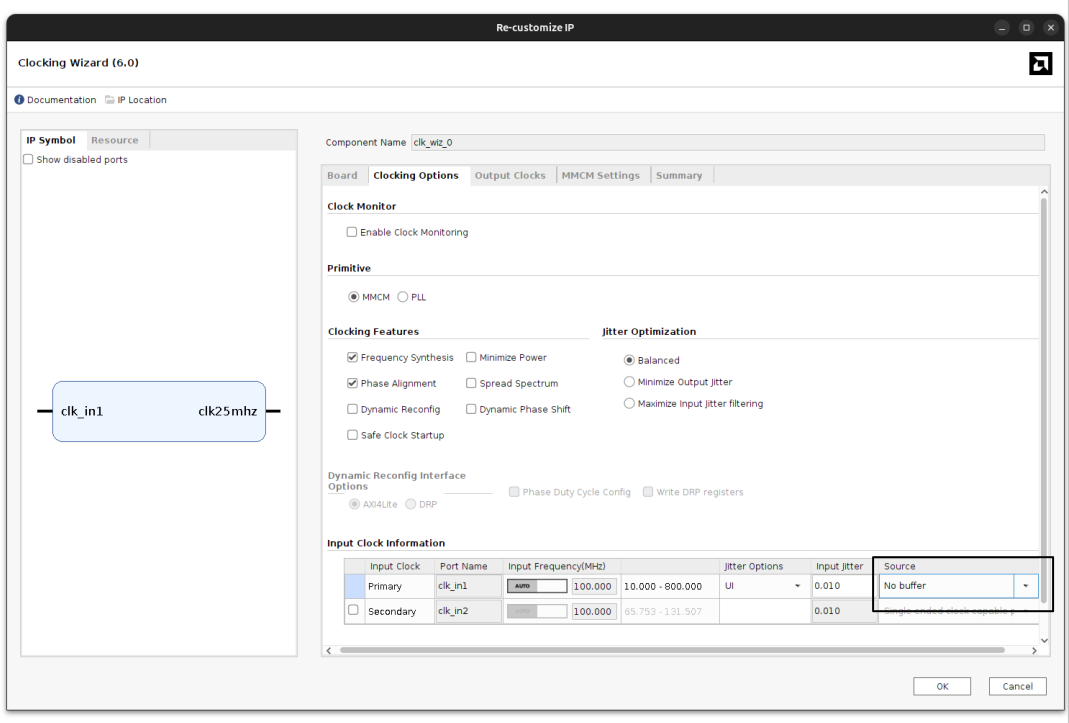
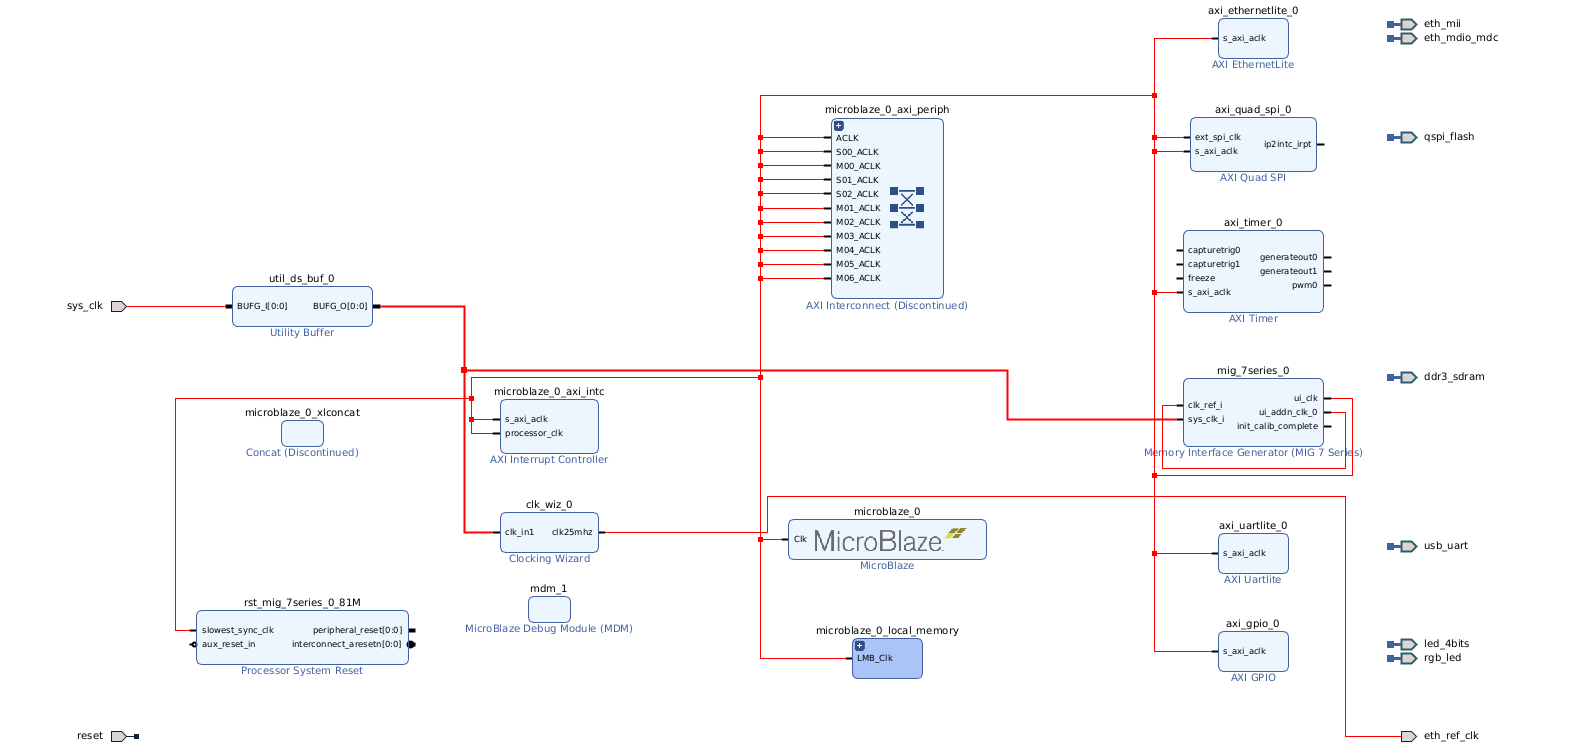
In the following image you can find a simplified schema of the clocks.
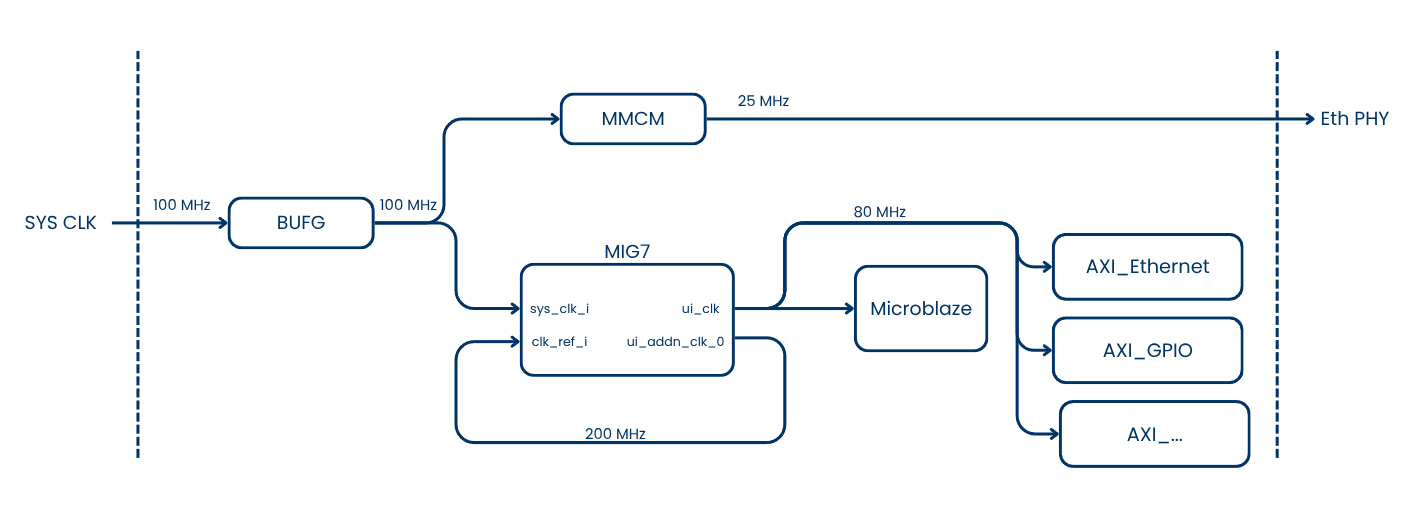
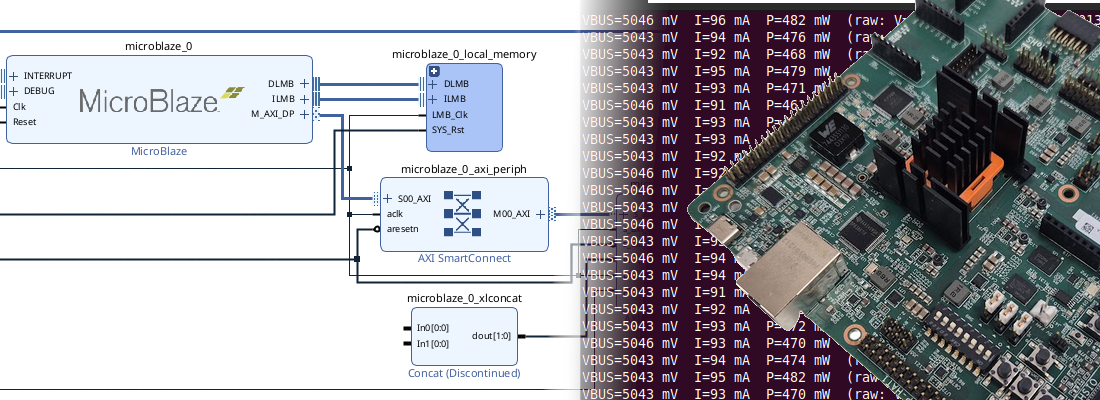
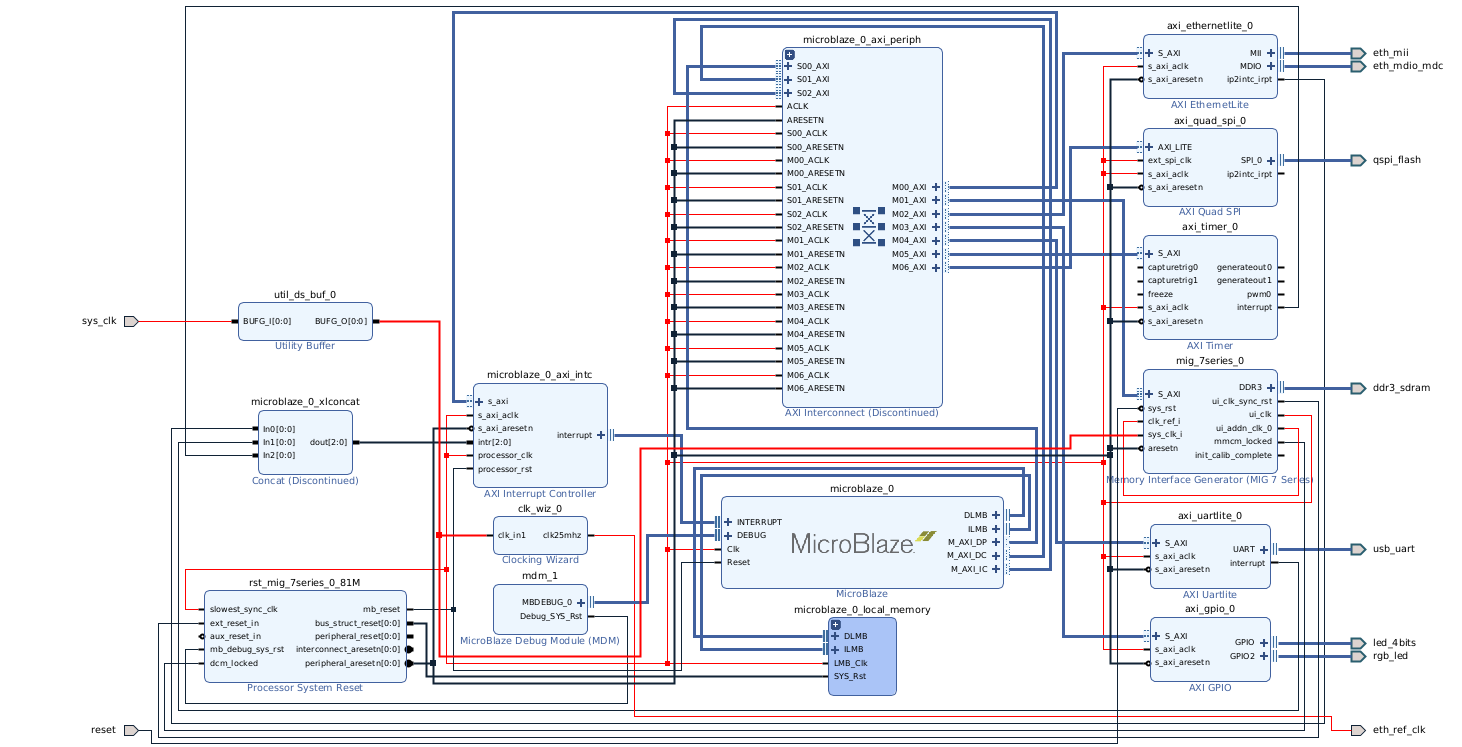
This clocking structure translates to the Vivado block design below.
And finally, the complete block design can be found below.
PetaLinux build
Creating a PetaLinux project is a very straightforward process nowadays (it will change at the end of 2026). First, we need to create a PetaLinux project using the microblaze template, and import the XSA from Vivado:
petalinux-create --type project --template microblaze --name arty_ai
cd arty_ai
petalinux-config --get-hw-description ../hw
Since this PetaLinux distribution will run from the Arty board’s DDR memory, we need to keep it as light as possible, so we can disable features we won’t use. Fortunately, the microblaze template disables many features, but SSH Dropbear is still enabled. If we only talk to the board over UART, we can disable it, not just to reduce the image size, but also because during boot it has to generate RSA keys, which can take a few minutes on an 80 MHz processor.
We can do this by opening the Root FileSystem configuration.
petalinux-config -c rootfs
Device tree modifications
Regarding the device tree, most of the peripherals used have their own driver in PetaLinux, however, we will need to add a minimal PHY description and a stable MAC address in project-spec/meta-user/recipes-bsp/device-tree/files/system-user.dtsi:
&axi_ethernetlite_0 {
  local-mac-address = [00 0a 35 00 01 22];
  phy-handle = <&phy0>;
  xlnx,has-mdio = <0x1>;
  mdio {
    #address-cells = <1>;
    #size-cells = <0>;
    phy0: phy@1 {
      device_type = "ethernet-phy";
      reg = <1>;
    };
  };
};
This matches the AXI Ethernet Lite instance and the PHY address on the Arty A7.
Finally we are ready to build the PetaLinux distribution.
petalinux-build
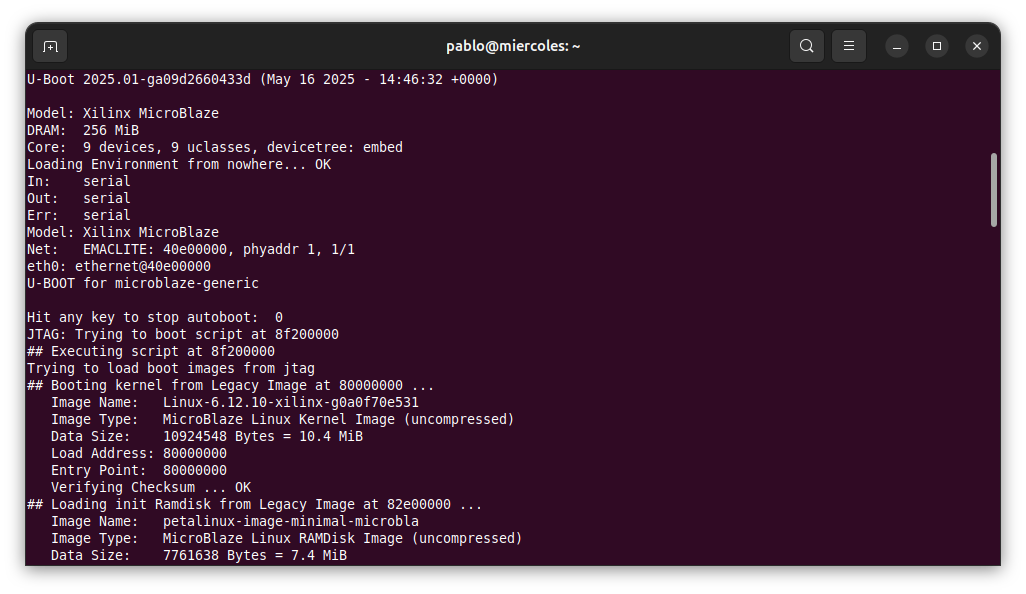
Booting up the board
Since the flash memory of the board is too small to keep a Linux distribution (it is only 16MB), we are going to boot the board from the JTAG interface.
This will load the different partitions directly into DDR memory, and finally boot the board.
petalinux-boot --jtag --kernel
[NOTE] Argument: "--jtag" has been deprecated. It is recommended to start using new python command line Argument.
[NOTE] Use: petalinux-boot jtag [OPTIONS]
[INFO] Use Bitstream: /home/pablo/arty_ai/os/images/linux/system.bit
[INFO] Please use --fpga <BITSTREAM> to specify a bitstream if you want to use other bitstream.
[INFO] Launching XSDB for file download and boot.
[INFO] This may take a few minutes, depending on the size of your image.
attempting to launch hw_server

****** Xilinx hw_server v2025.1
  **** Build date : May  6 2025 at 15:14:51
    ** Copyright 1986-2022 Xilinx, Inc. All Rights Reserved.
    ** Copyright 2022-2025 Advanced Micro Devices, Inc. All Rights Reserved.

INFO: hw_server application started
INFO: Use Ctrl-C to exit hw_server application

INFO: To connect to this hw_server instance use url: TCP:127.0.0.1:3121

INFO: Configuring the FPGA...
INFO: Downloading bitstream: /home/pablo/arty_ai/os/images/linux/system.bit to the target.
INFO: Downloading ELF file: /home/pablo/arty_ai/os/images/linux/u-boot.elf to the target.
INFO: Loading image: /home/pablo/arty_ai/os/images/linux/linux.bin.ub at 0x80000000.
INFO: Loading image: /home/pablo/arty_ai/os/images/linux/system.dtb at 0x81e00000.
INFO: Loading image: /home/pablo/arty_ai/os/images/linux/rootfs.cpio.gz.u-boot at 0x82e00000.
INFO: Loading image: /home/pablo/arty_ai/os/images/linux/boot.scr at 0x8f200000.
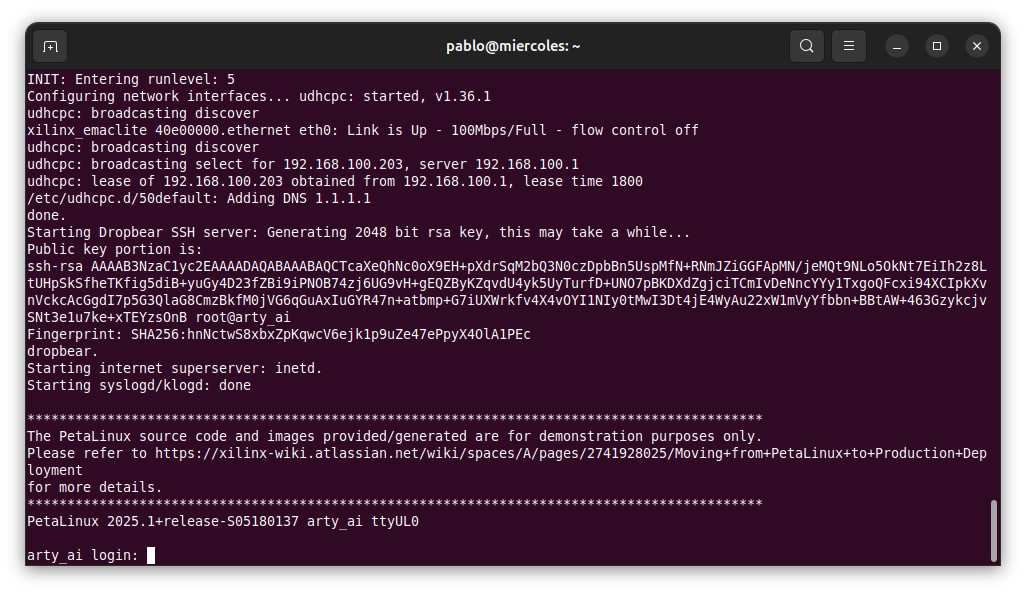
Next, we can verify the internet connection with the ping command.
arty_ai:~$ ping 8.8.8.8
PING 8.8.8.8 (8.8.8.8): 56 data bytes
64 bytes from 8.8.8.8: seq=0 ttl=116 time=13.338 ms
64 bytes from 8.8.8.8: seq=1 ttl=116 time=13.123 ms
64 bytes from 8.8.8.8: seq=2 ttl=116 time=13.085 ms
64 bytes from 8.8.8.8: seq=3 ttl=116 time=12.610 ms
64 bytes from 8.8.8.8: seq=4 ttl=116 time=12.282 ms
64 bytes from 8.8.8.8: seq=5 ttl=116 time=12.125 ms
At this point, we are ready for the next step.
AI chat script
As you could see, there was nothing related to AI in this article until now. In order to execute the AI chat on this board, we are going to use a free API that allows very tiny processors like the one we have implemented to “execute” an AI chat. The API I am going to use is the one from Pollinations.ai.
Pollinations.ai exposes a free text (and image) generation endpoint that can be called over plain HTTP without an API key. The text.pollinations.ai endpoint returns a short response for the prompt you provide, which makes it perfect for this kind of applications.
Following its Getting started guide, we can read that for text generation, we can execute a GET command to the URL http://text.pollinations.ai/{prompt}, and then it will return the response of the model.
Usually, for this kind of request, we would use the curl command, but it is not implemented by default in PetaLinux, so we need to add it, making the image heavier. Instead, I used the wget command, which is integrated in BusyBox. The command to make the request is the following.
arty_ai:~$ wget --no-check-certificate -q -O - "http://text.pollinations.ai/what-is-an-fpga"
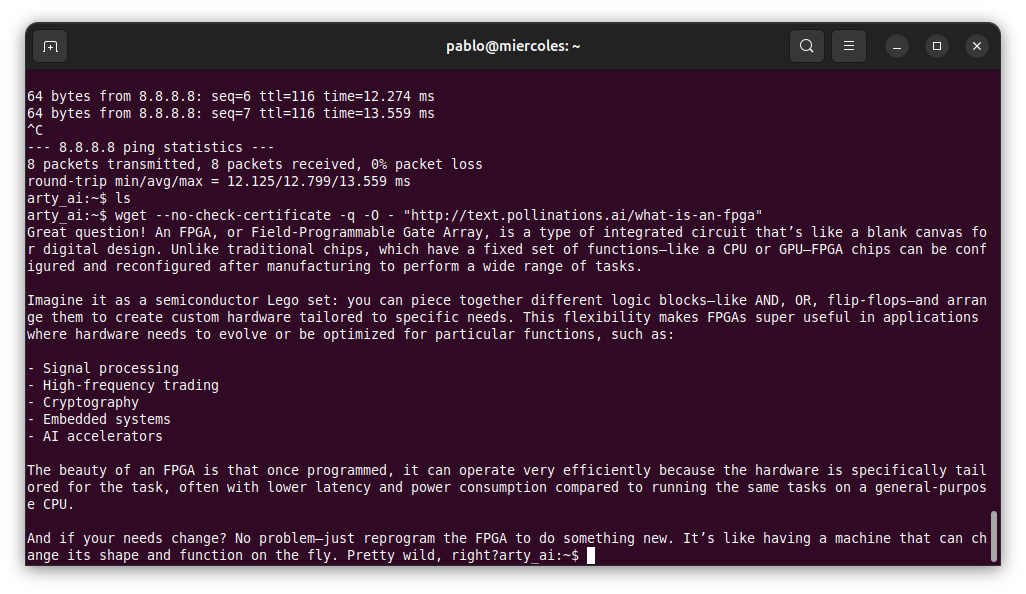
Here we have our AI Chat!
Then, we can make it nicer by creating an application. My first approach was using a C application, but it needs to be compiled, either in PetaLinux by adding the gcc command, or on the host computer by using a cross-compiler. Since my idea was to make it as simple as possible, why not a shell script?
I created the arty_ai.sh script with the content below.
#!/bin/sh

# Print a header just once
echo "--- FPGA AI Chat (controlpaths Engineering) ---"
echo "--- (Type 'exit' to quit)                   ---"
echo ""

# Welcome message
echo "Hello, how can I help you?"

while true; do

    echo -n "> "
    # User input
    read -r USER_INPUT

    # Check if the input is exactly "exit"
    if [ "$USER_INPUT" = "exit" ]; then
        echo "Goodbye!"
        break
    fi

    # Check for empty input
    if [ -z "$USER_INPUT" ]; then
        continue
    fi

    # replace spaces with %20
    INPUT_ENCODED=$(echo "$USER_INPUT" | sed 's/ /%20/g')

    # request
    echo "--- AI ---"
    wget --no-check-certificate -q -O - "http://text.pollinations.ai/$INPUT_ENCODED"

    # add separator
    echo ""
    echo "-------------------"
    echo ""
done
If you disabled the Dropbear SSH, you need to create and write the script in the terminal. This can be done using the touch command to create the file, and then vi to paste the content.
Finally, we just need to make it executable, and run it.
chmod +x arty_ai.sh
./arty_ai.sh
The result is the following.
Conclusions
Today, executing an AI model as fast as you can see in the video is impossible with a small FPGA like the Artix A35t. I advised you in the last article that this would be the most hyped post I wrote, and I think I didn’t disappoint you in that way. However, the fact is that, following this guide, you can have an AI chat running on an Arty board, with free models? yes, models that are not as good as the newer ones? yes, but remember that these models were the flagship models a year ago, imagine when Gemini 3 or GPT 5.2 will be the old models…
Happy 2026!