KR260 video capture with Jupyter + Python (libGL Mesa)

Video is probably the most hyped field in which FPGAs are used, at least until the AI arrival. I have to say that I worked with video very few times, and those times were from the FPGA side reciving video data from MIPI interfaces and send it to the DDR. However, FPGA, and specially SOCs can be your best ally in Video processing projects, either from the PL or the PS.
In this article, we are not going to see Video processing from the FPGA side, but from the ARM side, so it will be useful if you are working with a powerful SOC with a ARM or RISC-V processor and an FPGA, and also if you are working with only a microprocessor ;)
The idea is show how by customizong the embedded Linux distribution, Petalinux in this case, and adding some Python packages we are going to be able of capturing video and processing it in a very easy way.
The board I am going to use is the KR260 kit, and we are going to stream video frames into a Jupyter Notebook reachable over Ethernet. The flow is simple: customize PetaLinux to include libGL (Mesa) and a Jupyter package group; boot the board; ssh in to install a few Python packages; start jupyter-notebook bound to 0.0.0.0 and read frames from a camera under /dev/video* with OpenCV; finally, run Canny to detect edges.
Table of Contents
- Build a PetaLinux image with libGL (Mesa) and Jupyter access
- Get the KR260 IP, SSH into it, and install Python packages
- Running Jupyter Notebook headless and expose it over Ethernet
- Find the camera under /dev and capture frames in a Notebook
- Edge detection with Canny
- Conclusions
Build a PetaLinux image with libGL (Mesa) and Jupyter access
First of all we will need to customize the Petalinux distribution in order to add some needed packages. We’ll enable two things in the rootfs:
- Mesa / libGL runtime (to satisfy OpenCV’s GL deps)
- A Jupyter package group so we can launch notebooks on-board
From your PetaLinux project:
petalinux-config -c rootfs
Then. in the opened menu, enable these two packages. Names are valid in petalinux 2025.1, for orhter versions they can vary.
Filesystem Packages -->
  libs --> mesa
    [*] libgl-mesa
User Packages --> misc
  [*] packagegroup-python3-jupyter   # mismo paquete del lab9
Once these two packages are enabled, we can build the Petalinux distribution.
petalinux-build
Get the KR260 IP, SSH into it, and install Python packages
After boot, find the IP (via dmesg | grep eth, ip addr, or from your DHCP server). The, from the host computer we are going to open an SSH session.
ssh root@<kr260-ip>
Now, we are going to install some Python packages (OpenCL optional; we’ll use OpenCV + PIL):
pip3 install opencv-python
pip3 install matplotlib
Running Jupyter Notebook headless and expose it over Ethernet
When we are sure that the camera is detected, and we have all the Python packages installed, we can then launch de Jupyter Notebook From the KR260 shell:
jupyter-notebook --no-browser --ip=0.0.0.0
The default port is 8888, if you need to change it just add the --port XXXX argument.
Then, in the console, you will see a URL with a token, something like:
http://0.0.0.0:8888/?token=…
Then, from your host browser, open:
http://<kr260-ip>:8888/?token=…
And now we will be inside the Jupyter Notebook of the KR260 from the host computer.
Find the camera under /dev and capture frames in a Notebook
At this point, we can connect the webcam to the KR260 and check if it is detected by listing the video devices
ls -l /dev/video*
video0
video1
Then, we can create a new Python3 notebook.
First, we need to import the Python packages needed.
import time
from PIL import Image
from IPython.display import display, clear_output
import cv2
Next, we are going to need to open the capture device, configure the resolution and finally, using a loop, capture the frames and show them using display.
# Pick the device (0 is usually /dev/video0)
cap = cv2.VideoCapture(0)  # pass an int or a device path e.g. "/dev/video1"
if not cap.isOpened():
    raise RuntimeError("Cannot open camera")

# Optional: set resolution / fps (depends on sensor/driver)
cap.set(cv2.CAP_PROP_FRAME_WIDTH,  640)
cap.set(cv2.CAP_PROP_FRAME_HEIGHT, 480)

for i in range(100):
    ret, frame = cap.read()
    if not ret:
    print("Error reading frame.")
    break

    # Convert to grayscale
    gray = cv2.cvtColor(frame, cv2.COLOR_BGR2GRAY)

    # Convert to RGB to display in Jupyter
    img_rgb = cv2.cvtColor(gray, cv2.COLOR_GRAY2RGB)
    img_pil = Image.fromarray(img_rgb)

    # Clear and display
    clear_output(wait=True)
    display(img_pil)

    # Delay between frames
    time.sleep(0.05)

cap.release()

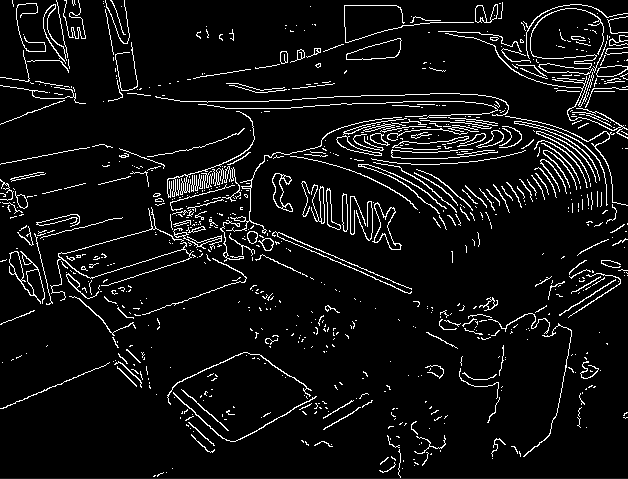
Edge detection with Canny
A very useful image processing we can apply to the captured video is Canny. An algorithm to detect the edges of the image. In Python, once the frame is captured, and converted to grayscale, we need to apply to it.
for i in range(150):
    ok, frame = cap.read()
    if not ok:
        print("Error reading frame.")
        break

    # Convert to grayscale
    gray = cv2.cvtColor(frame, cv2.COLOR_BGR2GRAY)

    # Apply canny edge detection
    edges = cv2.Canny(gray, 100, 100)

    # Stack original (small) + edges
    img_rgb = cv2.cvtColor(edges, cv2.COLOR_GRAY2BGR)
    img_pil = Image.fromarray(cv2.cvtColor(combo, cv2.COLOR_BGR2RGB))

    # Clear and display
    clear_output(wait=True)
    display(img_pil)

    # Delay between frames
    time.sleep(0.05)
Below you can find the obtained image.
Conclusions
In this article we saw how to use the PS to capture and process video; however, with devices like Zynq MPSoC or PolarFire SoC the possibilities are endless. Capturing video with a USB camera means that if fast processing is needed, the frames must travel from the PS to the PL, be processed, and then come back to the PS to be displayed. If you are working with an FPGA and need high-speed video, you should set the processor aside and rely on the FPGA alone. Using a MIPI interface to acquire the video signal, a few video-processing IP blocks, and finally a digital interface like HDMI to send the frames to the display is by far the fastest option. However, if video capture is not the main goal of the project and 10 or 20 frames per second is enough, this solution can be very valid.