Base acceleration design for Genesys ZU 5EV

 Genesys ZU
In this blog we have used many different boards, many from Digilent but also boards from AMD or Trenz. Now, if you search in internet about acceleration using AMD parts, you will find many articles that use the new Kria SOMs, either the KV260, the KR260 or the newest KD240, but in reality, boards that were released some years ago can do the same, or even more, then the newest boards. One of the more powerful boards I have is the Digilent Genesys ZU 5EV, a board based on the Zynq MPSOC 5EV. This board features HDMI (IN and OUT), Display Ports a complete FMC LPC, SFP, USB, Ethernet, MIPI… Si, in this article, we are going to generate a platform for an acceleration design with the Digilent Genesys ZU and Vitis 2023.2, let’s go!
First of all, we are going to create a new project for the Genesys ZU 5EV board. The project will be located in the /hw folder.

Since this project will be used as a base design for an acceleration project, we need to activate the checkbox Project is an extensible Vitis platform. Also, since the project does not have extra source files in the HW design, we can check the option Do not specify sources at this time.

Then, when the project is created, we can create a block design. In my case, I always name the block design as the name of the project with the _bd suffix.

In the block design, we need to add first the Zynq Processing System and apply the preset configuration. Then, we need to add a Clocking Wizard to generate the clocks that, later, will be used for our kernel. The AMD documentation, as well as all the project examples that I have found use three different clocks. The first one of 100 Mhz, is used for some AXI IPs, for example, if we want to add an AXI GPIO to manage the LEDs of the board, and also two additional clocks of 150 MHz and 300 MHz used by the kernels. In the Clocking Wizard configuration, we also need to change the polarity of the reset to Negate, since the output reset of the PS has this polarity.
Each of these clocks has to be its own reset, so we need to add three Processor System Reset IPs, and connect each of them to a different clock. We can do this from the Run Connection Automation.

Once the three clocks are connected with their corresponding Reset, the resulting Block Design will look like the next.

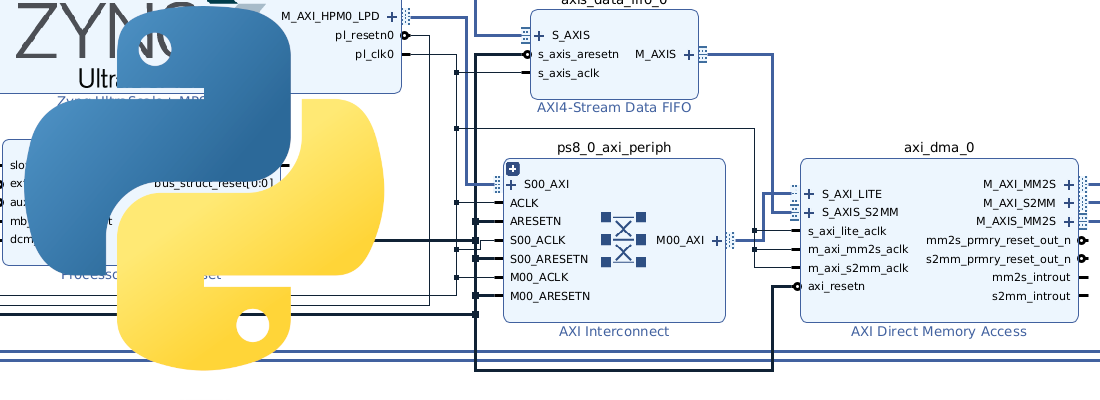
Now we need to add an AXI Interrupt Controller, to allow the kernels generate interrupts into the PS. This AXI Interrupt Controller will be connected to a new AXI Interconnect, and to the 100 MHz clock from the Clocking Wizard.

Also, in the configuration of the AXi Interrupt Controller, we need to change the Interrupt Output Connection from Bus to Single.

Finally the IRQ output will be connected to the PS interrupt input. The next image shows the Block Design complete.

Now we need to define the resources that will be available for the kernels. If we are thinking in a specific kernel, we could make available just the resources that the kernel needs, but if we want to create a platform that will be able to run different kernels, we need to make available a bunch of resources that allow us to run them. To configure the clock resources, we need to navigate to the Clock tab on the Platform Config, and make available all of them. In addition, we need to select one of them as the default clock.

Next, we need to enable the AXI interfaces. We can add all the AXI interfaces except the interface that we are already using in the block design.

Finally we need to enable the interrupt controller used by the kernel, which is the AXI Interrupt Controller added.

Now, the Block Design and the Platform Setup are complete, so we can generate the wrapper, and the bitstream. When the block design is verified, Vivado will show a warning indicating that the interrupt input of the AXI Interrupt Controller is nos connected, but this is not wrong in this case since this input will be used by the kernel.

When the bitstream is generated, we have to export the platform. This step is pretty similar to the Export Hardware in a nonextensible platform. In fact, the output file is also a .xsa file. In this case, Vivado will ask us about the information of the platform.

When we talk about acceleration, the first that comes to our mind are big data centers or expensive accelerator boards. However, it is very interesting how every Zynq MPSOC board can be transformed into an acceleration platform using the PS as the main processor, and the PL as the acceleration board. With this platform completed, we can now use the Genesys ZU 5EV as a base platform to test some RTL kernels, as well as we can do with the Kria K24 or K26 SOMs.